Create Developer Projects for Salesforce DX and Git Repositories that work with Visual Studio Code.

Metadata Snapshots can be created on the desktop and connected to a live Salesforce org. When you take a snapshot, metadata assets are downloaded from the org, and this information is used for reporting and metadata deployment. But there is another way to work with metadata assets. Developer Projects are not connected to an org, but rather to a local folder on your computer. The files in this folder can be organized in a variety of popular formats, including Salesforce DX. The files can be edited by hand and with developer tools like Visual Studio Code. Developer Projects can also be dynamically linked to Git Repositories. Many of the Snapshot reports can also be run on Developer Projects. This white paper explores how Developer Projects work, and the best use cases for org management.

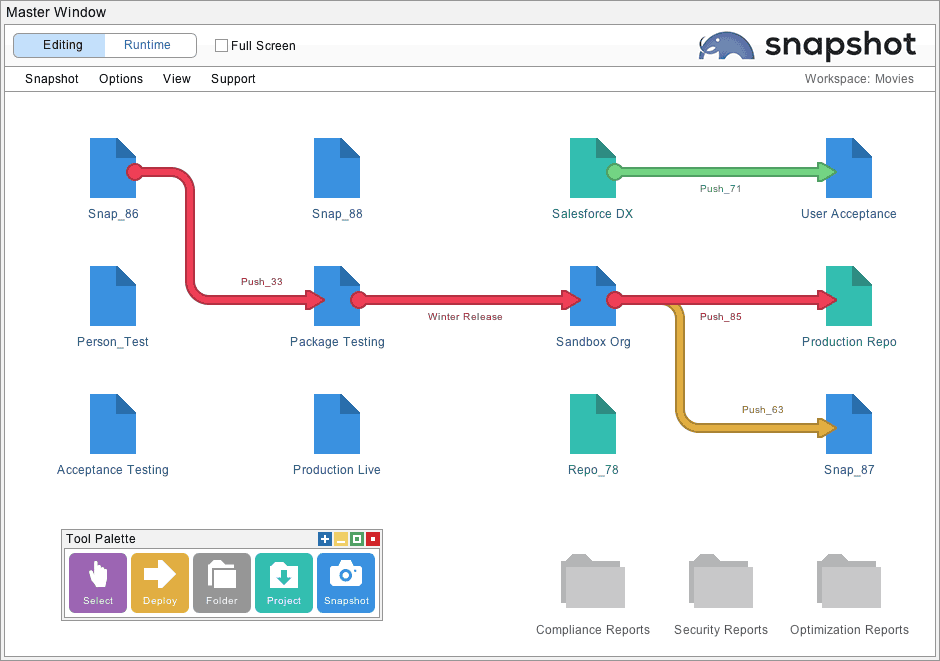
The Developer Project icon is next to the Metadata Snapshot icon in the Tool Palette. To create a Developer Project simply drag the icon to the desktop. You can right-click and double-click Developer Projects like a Metadata Snapshot. Metadata Snapshots are shown in blue, and Developer Projects are shown in green.
If you right click the Developer Project, you will see the reports that can be run. Reports that depend on data records will not be available because Developer Projects only contain metadata information. You can also connect Developer Projects and Metadata Snapshots with arrows. One of the most powerful capabilities for Developer Projects is that you can deploy metadata between projects and live orgs. This is discussed in more detail below.
After creating a Developer Project, you can right-click or double-click the icon and bring up the editing interface. The first screen allows you to select the local project folder. Click the “Browse For Project” button and select a local folder on your computer. You will need full access right for this folder. This is where the metadata files in the Developer Project will be stored. Each Developer Project should have a unique local project folder in a stable location.

After that, you should select the file format for the Developer Project. The options at lower left are Metadata API Format, Force.com IDE Format, and Salesforce DX Format. Use the Metadata API Format if you are unsure about the best option. The Force.com IDE is a plugin for Eclipse that has a special file format. To use the Salesforce DX option, you must have the Salesforce CLI installed on your client computer. The Salesforce DX format is also called “source format” which is sometimes required for DevOps projects. When using the Salesforce DX File Format, you probably want to check the option at right for the “Single Unpackaged Folder.” This option maps the “force-app” folder in Salesforce DX to the “unpackaged” folder that is used by the Metadata API. When you switch between these three options, Snapshot will offer to remap existing files to the desired format.
Each Developer Project can optionally be associated with a content repository like GitHub, GitLab, BitBucket, or Azure DevOps. To do this, select the Remote Repository option at right. We discuss setting up authentication for the remote repository below. To use remote repositories, you will need the Git CLI installed on your client computer. Please contact Metazoa Support if you are having trouble installing the Salesforce CLI or the Git CLI. When this is set up you can easily move metadata assets back and forth to any Git repository in any of the file formats. As you switch between file formats and remote repositories, you will see the tabs at the top of the Developer Project interface change. The next section explores the options available for the six different kinds of Developer Projects:
The Metadata API File Format is the most common format for Developer Projects. Normally the first level of folders will be named after packages, including a folder for unpackaged assets. Inside each package folder will be the familiar Metadata API folders such as Classes, Objects, etc. Inside those folders will be XML documents with Metadata API file extensions. This is the raw format returned by the Metadata API Retrieve call. The format for the Force.com IDE is similar, except that packages are stored in the “referenced packages” folder and unpackaged assets are stored in the “src” folder.
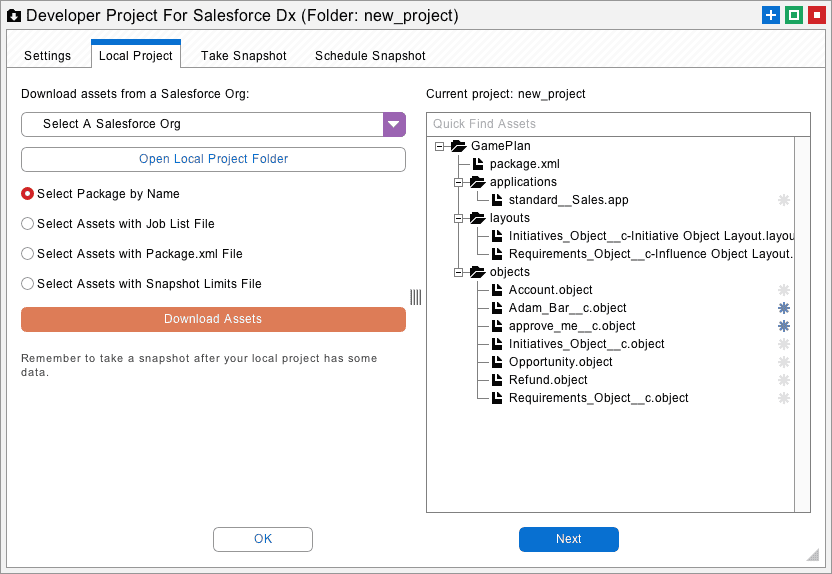
The second tab for a local project in Metadata API File Format or Force.com IDE File Format has an interface to help populate the project folder. There are options to download assets by package name or to select them with a Job List file, a Package.xml file, or a Snapshot Limits file. Choose one of the options and click the download assets button to populate the local folder. Here are some additional notes on all the different ways to populate a local project with metadata files:
These options provide a quick way to populate your Developer Project with metadata assets. However, you can also simply leave the project empty and use the metadata deployment interface to add files to the project later. The files could come from a live Salesforce org or a remote repository. The sections up ahead discuss taking snapshots and conducting metadata deployments with Developer Projects.
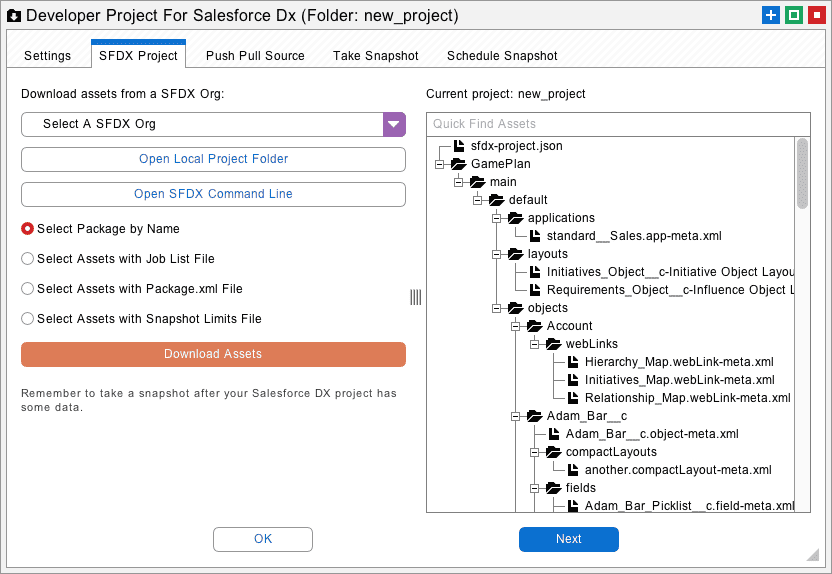
Salesforce DX is a command line technology, and Snapshot can leverage all the capabilities available in Salesforce DX through the CLI interface. This enables local folders in Salesforce DX format to have some additional capabilities beyond a regular developer project. The second tab provides tools to populate the Salesforce DX project with metadata. If you right click on the files displayed at right, you can create source code for a variety of objects. You can also open the local folder or launch the command prompt. Developers can use the command line to edit with Salesforce DX or other desktop tools. Here are the source code assets that you can create from the Snapshot interface:
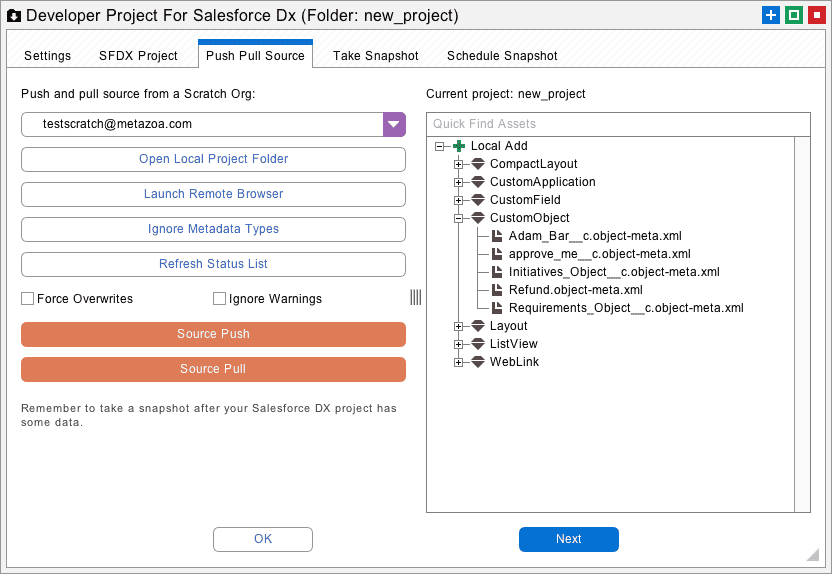
The third tab allows you to push and pull source code from Scratch Orgs. Select an existing Scratch Org or create a new one from the menu at top. The list at right will update with information about local assets in the project folder that could be pushed to the Scratch Org, and remote assets in the Scratch Org that could be pulled down.
Here is additional information on all of the options:
Select Scratch Org: Manage all of your Salesforce DX Dev Hubs, Connected Orgs, and Scratch Orgs. New Scratch Orgs can be created with this menu interface.
Open Local Project: Launch the local project and edit with the file system or other tools. These changes can be pushed to the Scratch Org with the Source Push option, below.
Open Remote Browser: Launch the currently selected Scratch Org in a browser. Make changes in the remote org for the Source Pull option, below.
Ignore Metadata Types: Select metadata types that will be ignored during a Source Push. This can help developers focus on certain types like Custom Objects or Apex Classes and ignore other types that might not be easy to deploy, like Profiles.
Refresh Status List: When local or remote changes have occurred, refresh the status list at right. This will display the local and remote differences between the project and Scratch Org. Sometimes conflicts occur, in which case the Force Overwrites option can be used to resolve them on the local project or remote Scratch Org.
Source Push: Deploy any local adds to the currently selected Scratch Org. The status list will update after the metadata deployment.
Source Pull: Retrieve any remote adds from the currently selected Scratch Org. The status list will update after the metadata is retrieved and the local project is updated.
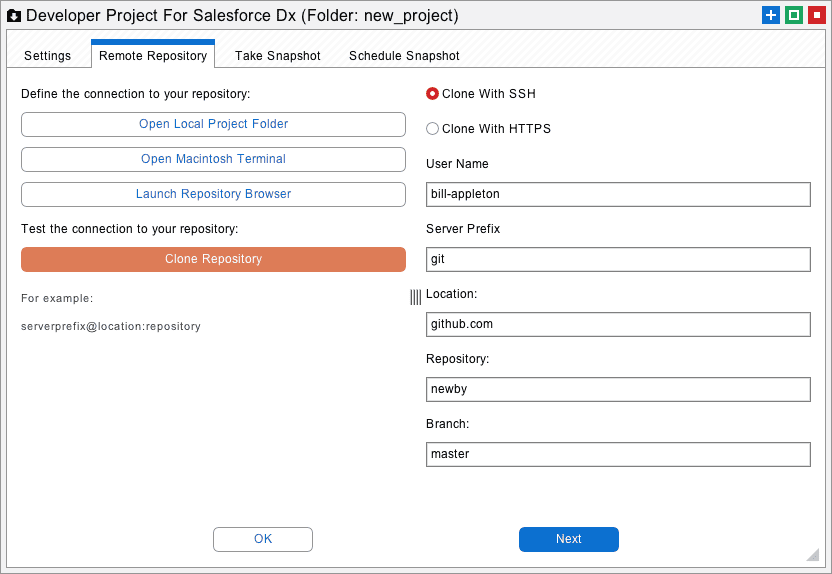
Your local Salesforce DX or Metadata API project can be optionally connected to a content repository like GitHub, GitLab, BitBucket, or Azure DevOps. In this case, the editing tools for the local project are no longer displayed, because the source of the metadata files is now the remote repository. The project folder is still used to store a local copy of the files. Developers can switch the interface back and forth to work on the local project or the content repository as needed. When the project is connected to a content repository, the files in the Developer Project will be replaced when a snapshot is taken.
The connection to a content repository can either be SSH (Secure Shell) or HTTPS (Hypertext Transfer Protocol Secure). Select either option and fill out the other fields below. To test the connection, click the Clone Repository button. If the command works, the repository will be cloned to the local folder. If there is an error, Snapshot will display the command line and the error that was returned. You can try this on a local terminal and figure out why the command failed. When the clone operation is successful the Developer Project is ready to go.
Just because the local folder has been populated with metadata assets does not mean that there is a snapshot available for the project. The take snapshot tab provides the interface to create a snapshot for the project. This option will convert Salesforce DX projects and harvest metadata files so that a snapshot can be created with the assets. This enables all the other capabilities in Snapshot to work with your Developer Project just like a live Salesforce org.
After a snapshot, you can connect your project to any other project or Salesforce org with a deployment arrow and compare assets, deploy metadata, manage the time series, and run many of the reports. If you right click the project, you will see the metadata reports that are available. Note that none of the data usability or security reports are listed, because a Developer Project does not have actual data like a real Salesforce org.
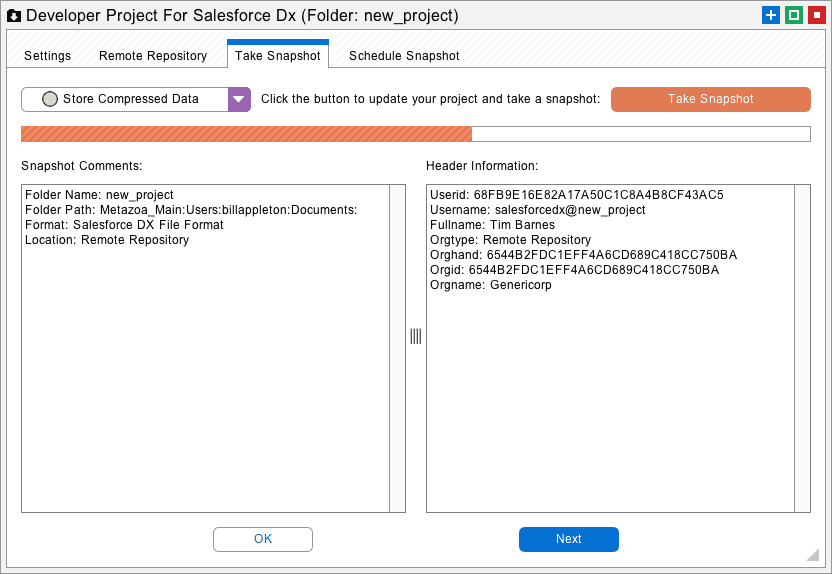
If your Developer Project is connected to a content repository then be aware that taking a snapshot will clone and/or pull the remote metadata asset files down to the local project folder. The files in your Developer Project will be updated by the remote repository every time a snapshot is taken.
The deploy metadata interface works with Developer Projects as either the source or the destination of the selected arrow. If a Developer Project is the source, then all the metadata assets in the current snapshot of the Developer Project are available for deployment. If the source project is a content repository, then a snapshot will update the project, and the latest metadata assets from the repository can be deployed. This works for Developer Projects in either Force.com IDE, Metadata API, or Salesforce DX format.
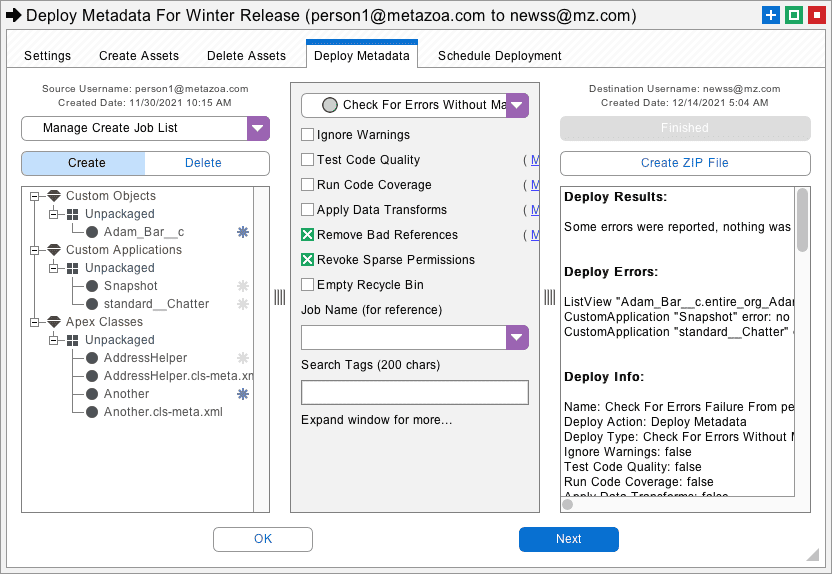
If a Developer Project is the destination of the deployment, then the files in the local project folder will be created, updated, and deleted just like an actual Salesforce org. If the project is connected to a content repository, then the remote files will be changed. This works for Developer Projects in any file format. The options to roll back a deployment or perform a quick deployment are disabled when the destination is a Developer Project.
The deploy metadata interface can be extremely helpful in straightening out Developer Projects or Salesforce orgs that have fallen out of synchronization. You can use the powerful metadata deployment interface to take snapshot of either the source or destination, compare the differences, and make whatever changes are needed. The different types of metadata deployments that are possible include:
This section discusses the best use cases for Developer Projects and org management. In many situations, Developer Projects can provide a bridge between Salesforce developers and administrators working on the org.
Metadata Editing
You can freely edit a Developer Project with an XML or text file editor. You can create new metadata assets, delete old ones, and update files as needed. You need to know what you are doing, and there is no guarantee that the changes will be valid metadata, but there is no limit to the changes that are possible. When everything is ready, you can take a snapshot of the Developer Project and deploy into a Sandbox or Production org. This is a very powerful way to make the changes that are needed in special circumstances.
Remote Repositories
If your DevOps team is using remote repositories as the source of truth, then Developer Projects let you move assets into the repository for backup and archive. You can create branches and move any Metadata Snapshot into the cloud as needed. In the same manner, you can download any repository, take snapshots, and run reports on the Developer Project. For example, the Impact Analysis report can be run on Salesforce DX projects.
Visual Studio Code
Developers using Visual Studio Code on the desktop can integrate Snapshot support for metadata deployment, metadata differences, and technical debt reporting simply by selecting the desired folder of metadata assets in their Developer Project.
Smart Deploy
Many Snapshot reports will run on a Developer Project. For example, you can improve Apex Code Quality on a Developer Project. In this situation, Smart Deploy will store all the code improvements inside the Developer Project instead of a live org. The project can easily be saved for the release management process at a later date.
This whitepaper has discussed how Developer Projects can help Salesforce administrators and developers. The Snapshot product from Metazoa provides a best-of-breed solution for using Developer Projects for org management.
© 2018-2024 Metazoa. All rights reserved. Proudly made in California
 Congratulations!